In a Northern Lights hunting expedition, my wife Liza and I went to Iceland in March of 2017. We caught the Northern Lights on two evenings out of eight.
But mostly it was cloudy, windy, and rainy. We went out every day anyway. Sometimes there were small breaks in the clouds. This was one of those times.
ISO 125 was hardly ideal. I should have been at ISO 400 or 800 to get a faster shutter speed to counteract the wind. It was windy as heck and I only got two sharp frames.
But this is one of those situations where you grab your camera, put on the right lens then start firing away. I pulled off the highway on the nearest road I could find to get that shot.
That is the widest (red to violet) rainbow I have ever seen. The rainbow lasted about 30 seconds or so, if that. We were on our way to the Svinafellsjökull Glacier in Vatnajökull National Park, image below.
This was our second trip to Iceland. We returned specifically to see the Northern lights. We caught a very good display on the last evening (the above links).
First Trip
Here are some links of favorite images on our first trip.
In March of 2017 my wife Liz and I went Aurora Borealis (Northern Lights) hunting in Iceland. It’s a popular destination for chasing the Northern Lights hunting, but the results are often mixed. I posted several Northern lights images (links below), but we only had one great nighttime excursion.
The rest of the trip was by no means a bust. Please take a chance.
This location is the Svartifoss Waterfall featuring basalt columns of volcanic rock.
The hike is 1.5 kilometers (0.93 miles), each way, from the visitor center, uphill. On the way to Svartifoss, you come across other waterfalls in the gorge. Svartifoss cannot be seen from the road and the hike up to it takes some 90 minutes back and forth with photo stops.
We got lucky. It was cloudy and rainy when we started the hike. The clouds broke for about 15 minutes as we reached the top.
Anyone with a tripod and reasonable technique could get this shot. The two keys are a tripod and reasonable technique. You need a tripod because you cannot hand hold for anywhere close to a second. Yet, if you do not force the shutter open that long, you cannot get smooth, silky water.
Closeup Detail
For the above shot, I was well off the trail, where I was not supposed to be.
My wife Liz, of saner mind, was not with me. The feature image was taken from the trail or at least reasonably close.
Equipment List
Those interested in my equipment and recommendations can find it here: Mish’s Equipment List.
Iceland is a fabulous destination. I have an entire series called Iceland in 16 days.
Scroll through my Mish Moments Home Page until you find them. I discuss where to go, where to stay, and what to see. I also have photo tips on many of the best locations.,
Interested in visiting Iceland?
Please see my Iceland Guide. It lists our complete itinerary for a 16-day summer solstice trip.
In March of 2017 my wife Liz and I went Aurora Borealis (Northern Lights) hunting in Iceland. It’s a popular destination for chasing the Northern Lights hunting, but the results are often mixed. We were in Iceland for 8 days but only saw the lights twice, and only one of those was particularly memorable. Iceland can be cloudy for a week, and unless it’s a clear night, you just will not see them.
We caught a fabulous display on our second to last day in Iceland. We stayed at the Budir Hótel which I highly recommend. The Hotel is just two hours drive from Reykjavik. It’s situated on a lava field next to the ocean and there are plenty of sightseeing activities in the area.
The Malarrif Lighthouse is in Snæfellsjökull National Park, located just a short walk from the National Park’s visitor center.
Feature Image Details
For these images, I used a Canon 16-35MM F4 L Lens: If I had to pick one lens and one lens only, this lens would be at the top of the list.
These shots were all taken at 16mm for 13 seconds at ISO 2500.
Exposure
It might not look like it but I underexposed the Northern Lights images. It is very easy to do at night. The display viewfinder looks good, but it isn’t. Trust the histogram, now what your eyes see.
I could have used at least one more stop of light on these shots. Instead of 13 seconds, I should have done 20 seconds.
Underexposed images looked really blotchy but I used Topaz Labs Denoise to smooth out the colors. The tradeoff was a loss of sharpness.
For these kinds of images, one needs to adjust the shadows and highlights negative. Otherwise, you will lose stars.
Night Rule
The longest exposure you can take without stars trailing (looking like streaks instead of pinpoints is governed by this equation.
ET = 400/FL
ET = seconds
400 is a constant by observation
FL is the focal length used in mm
In this case, I was at 16 mm so I could have gone about 25 seconds. That would have really brought out the shadow details much better. Also, I could have bumped the ISO a bit, to say 3200. A combination of 20-25 seconds at ISO 3200 would have been about right.
Obviously, you need a tripod for this.
Long exposures at night are typically not extremely sharp (think wind, moving lights, very dark shadows, etc). Northern Lights are also moving. If they are moving fast, and the exposure is too long you will get a blurry mess. Thus, there was merit in attempting to keep the exposure time down.
A faster lens can help, but that is at the cost of depth of field. Everything is a tradeoff.
Equipment List
Those interested in my equipment and recommendations can find it here: Mish’s Equipment List.
Iceland is a fabulous destination. I have an entire series called Iceland in 16 days.
Scroll through my Mish Moments Home Page until you find them. I discuss where to go, where to stay, and what to see. I also have photo tips on many of the best locations.,
Interested in visiting Iceland?
Please see my Iceland Guide. It lists our complete itinerary for a 16-day summer solstice trip.
In March of 2017 my wife Liz and I went Aurora Borealis (Northern Lights) hunting in Iceland. It’s a popular destination for chasing the Northern Lights hunting, but the results are often mixed. We were in Iceland for 8 days but only saw the lights twice, and only one of those was particularly memorable. Iceland can be cloudy for a week, and unless it’s a clear night, you just will not see them.
We caught a fabulous display on our second to last day in Iceland. We stayed at the Hótel Búðir which I highly recommend. The Hotel is just two hours drive from Reykjavik. It’s situated on a lava field next to the ocean and there are plenty of sightseeing activities in the area.
The Búðakirkja Church, sometimes called theBúdir Church is just as short, even walkable, distance from the hotel.
Feature Image Details
For these images, I used a Canon 16-35MM F4 L Lens: If I had to pick one lens and one lens only, this lens would be at the top of the list. I see things from a wide angle perspective. There is an entrance gate that detracts from the image that I edited out in Photoshop. It is between the highest rock walls on the very far right. You can see it in the images below. If I stood a bit further to the left, that would not have been necessary.
The exposure on most of these shots was 13 seconds at F4.5 at 24mm, ISO 2500.
A Peek Inside
The church is locked. I took that image through a church window, similar to the one you see on the opposite side, after clearing off all the smudges with lens cleaning tissues. It is an HDR blend of multiple exposures blended together in Lightroom and Photoshop. To take this image, the lens of my camera was right on the window, and I do mean that literally. If you break the window attempting this, don’t blame me. That shot was at 28mm.
Front Lock
Church Details
The sign says the first church was built there in 1703 by Bendt Laurdisen. It was later demolished and rebuilt. In 1816 the parish was abolished and the church was dismantled. One of the ladies of the parish fought strongly for a new church and eventually received a royal permission to build a new one, which stood ready in 1848. In 1987, it was reconstructed and consecrated the same year. Among the valuable possessions of the church are a bell from 1672, an altarpiece from 1750, an old silver chalice, two messing candlesticks from 1767, and a door ring from 1703.
A closeup look at the door ring image in my shot above says “1951”. Perhaps that is a replica of the 1703 door ring.
Exposure
It might not look like it but I underexposed the Northern Lights images. It is very easy to do at night. The display viewfinder looks good, but it isn’t. Trust the histogram, now what your eyes see.
I could have used at least one more stop of light on these shots. Instead of 13 seconds, I should have done 20 seconds.
Underexposed images looked really blotchy but I used Topaz Labs Denoise to smooth out the colors. The tradeoff was a loss of sharpness.
For these kinds of images, one needs to adjust the shadows and highlights negative. Otherwise, you will lose stars.
Night Rule
The longest exposure you can take without stars trailing (looking like streaks instead of pinpoints is governed by this equation.
ET = 400/FL
ET = seconds
400 is a constant by observation
FL is the focal length used in mm
In this case, I was at 16 mm so I could have gone about 25 seconds. That would have really brought out the shadow details much better. Also, I could have bumped the ISO a bit, to say 3200. A combination of 20-25 seconds at ISO 3200 would have been about right.
Obviously, you need a tripod for this.
Long exposures at night are typically not extremely sharp (think wind, moving lights, very dark shadows, etc). Northern Lights are also moving. If they are moving fast, and the exposure is too long you will get a blurry mess. Thus, there was merit in attempting to keep the exposure time down.
A faster lens can help, but that is at the cost of depth of field. Everything is a tradeoff.
Equipment List
Those interested in my equipment and recommendations can find it here: Mish’s Equipment List.
Iceland is a fabulous destination. I have an entire series called Iceland in 16 days.
Scroll through my Mish Moments Home Page until you find them. I discuss where to go, where to stay, and what to see. I also have photo tips on many of the best locations.,
Interested in visiting Iceland?
Please see my Iceland Guide. It lists our complete itinerary for a 16-day summer solstice trip.
In March of 2017 my wife Liz and I went Aurora Borealis (Northern Lights) hunting in Iceland. It’s a popular destination for chasing the Northern Lights hunting, but the results are often mixed. We were in Iceland for 8 days but only saw the lights twice, and only one of those was particularly memorable. Iceland can be cloudy for a week, and unless it’s a clear night, you just will not see them.
We caught a fabulous display on our second to last day in Iceland. We stayed at the Hótel Búðir which I highly recommend. The Hotel is just two hours drive from Reykjavik. It’s situated on a lava field next to the ocean and there are plenty of sightseeing activities in the area.
All of these shots were taken right on the hotel property.
Feature Image Details
For these images, I used a Canon 16-35MM F4 L Lens: If I had to pick one lens and one lens only, this lens would be at the top of the list. I see things from a wide angle perspective.
The exposure on most of these shots was 13 seconds at F4.5 at 16mm, ISO 2500.
In the image immediately above, you should be able to spot the constellation Orion on the lower left (it is setting). Also, see if you can find the Big Dipper in the upper right. In the feature image the bright light above the volcanic cone is the setting crescent moon.
It might not look like it but I brutally underexposed all of these images. It is very easy to do at night. The display viewfinder looks good, but it isn’t. Trust the histogram, now what your eyes see.
I could have used at least one more stop of light on these shots. Instead of 13 seconds, I should have done 20 seconds.
Night Rule
The longest exposure you can take without stars trailing (looking like streaks instead of pinpoints is governed by this equation.
ET = 400/FL
ET = seconds
400 is a constant by observation
FL is the focal length used in mm
In this case, I was at 16 mm so I could have gone about 25 seconds. That would have really brought out the shadow details much better. Also, I could have bumped the ISO a bit, to say 3200. A combination of 20-25 seconds at ISO 3200 would have been about right.
Obviously, you need a tripod for this.
Underexposed images looked really blotchy but I used Topaz Labs Denoise to smooth out the colors. The tradeoff is a loss of sharpness.
Long exposures at night are typically not extremely sharp (think wind, moving lights, very dark shadows, etc). Northern Lights are also moving. If they are moving fast, and the exposure is too long you will get a blurry mess. Thus, there was merit in attempting to keep the exposure time down.
A faster lens can help, but that is at the cost of depth of field. Everything is a tradeoff.
Equipment List
Those interested in my equipment and recommendations can find it here: Mish’s Equipment List.
Iceland
Iceland is a fabulous destination. I have an entire series called Iceland in 16 days.
Scroll through my Mish Moments Home Page until you find them. I discuss where to go, where to stay, and what to see. I also have photo tips on many of the best locations.,
Interested in visiting Iceland?
Please see my Iceland Guide. It lists our complete itinerary for a 16-day summer solstice trip.
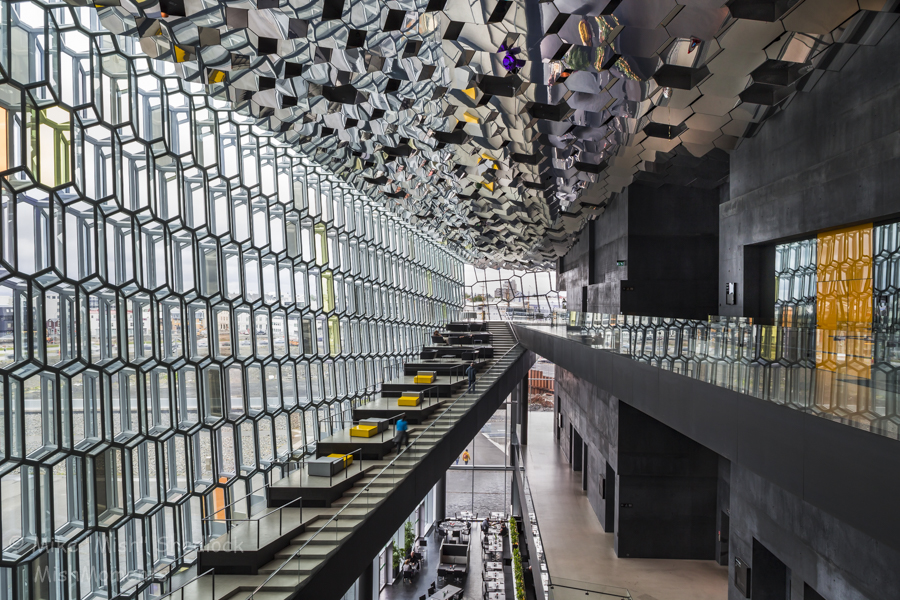
On our way from the Reykavik Sun Voyager Statue at 3:30 AM for the hotel and a 10:30 AM flight, I had to pull over a second time to take images of the Harpa Concert Hall.
The sky was on fire. Here is a second image of the concert hall, from closer in.
24MM was just not wide enough to bring in the entire image. I was standing on a concrete pillar away from the building as high as I could get to minimize the need to shift.
Even though the building was obscurely designed with weird angles (on purpose), pointing a wider lens up to bring in the top would have distorted the rest of the image in an observable manner. In retrospect, I might have tried taking a second image of just the top of the building and blending the images in more of a 4×3 format instead of 3×2.
A still better idea would have been to use a 17MM Tilt-Shift Lens instead of a 24MM tilt-shift lens. I now have both, I didn’t then. If your decision is between the two, get the 17MM lens. It’s far easier to crop an image than it is to add what isn’t there.
The feature image was taken at 4:30 AM. Our flight was 10:30 AM. We only got a couple hours sleep, but these images were well worth the cost of no sleep.
I hope I have convinced you to take a trip to Iceland. We are going back.
Please Share!
If you like this article, please share by email or use one of the share buttons beneath the article.
This was our final day in Iceland. We were out past midnight at the Brúarfoss Waterfall on the Golden Circle, the day before our 10:30AM flight back to the US.
On the way back to the hotel, we passed the Sun Voyager statue. When we passed the statue, the sky was gray, but there were interesting clouds. There was also a hole on the horizon. This was a perfect setup.
No better conditions exist than a break in the clouds on the horizon, with lots of clouds above. There was no guarantee the sun would hit a hole on the horizon. The clouds may have dissipated, moved, or completely blocked up.
As tired as I was, and despite a morning flight, I had to pull over and wait. The wait was worth it.
Notice the break in the clouds on the horizon. The sky was gray but I noticed the break and pulled over hoping the break would last and it did. After finishing these shots, it was 3:30 AM, and we had a 10:30 AM flight.
Off to bed? Perish the thought. There’s still time left.
Please Share!
If you like this article, please share by email or use one of the share buttons beneath the article.
Photography tours often speak of “secret waterfalls” or secret places. This is one of those locations. Brúarfoss is difficult to find, even with instructions. I would not have found it, or even heard of it without instructions.
If you are planning a trip to Iceland, get the book.
Forever Light gives instructions to Brúarfoss. Now that you have the name, you can likely find instructions elsewhere, but the book is well worth it regardless. Note: I had the first edition. The above links to the revised edition.
We found the spot on our first attempt, using the second of the two ways noted in the eBook. When we arrived at the designated parking spot, it did not look as described. The parking are was on the left, not the right. When I stopped to ponder the situation, I saw some people off in the distance walking. I presumed they were headed to the falls and parked.
To the Forever Light instructions, I will add there was a fence on our right and we followed a very narrow rutted path (one shoe wide) to a the main trail that we had to hop a fence to get to. Thereafter, we just followed the trail.
You come out of the tail into an opening and a bridge over the river. Remember the spot or you might take the wrong trail back. This sounds more difficult than it was, and reading the instructions again now, I am not sure I would have tried.
The book cautions that no one found the location on their first try, but we did, without a Garmin. We went once during the day, then returned for sunset. From where we parked, the waterfall was 20 minutes or so away. The makeshift trail and the main trail were both level. The hard part is making up your mind to try.
Brúarfoss Images Getting Cold and Wet
The above image was taken mid-afternoon in the stream beneath the bridge. Yes, I got wet. Yes, it was cold.
The following images were taken at sunset, standing on the bridge over the river. Beware of vibrations. It is very difficult to get sharp images if anyone else is on the bridge.
You cannot get these shots, if people are walking on the bridge. Even 1 second images will be ruined if people are walking about.
The water really does look blue. The color is different mid-day than at sunset.
It was about midnight when we took the sunset images. We were 20 minutes away from the car, with perhaps 90 minutes to get back to the hotel, with 10:30 AM flight. Nonetheless, my wife Liz volunteered to stay for sunrise. I wanted to, but I had a nagging feeling it was best to go back to Reykavik.
have learned it is best not to fight strong intuitions. So, off to bed, or so I thought, as explained in my next post.
Please Share!
If you like this article, please share by email or use one of the share buttons beneath the article.
After a good night’s sleep in Reykavik, one of about three good sleeps for the entire trip, we set off for a tour of the “Golden Circle”.
It was cloudy when we set out, and stayed cloudy most of the time. We went to see the geysers at Geysir, and had lunch there. Geysir was overloaded with tourists. Masses of buses constantly came an went. Mid-day is not a great time for photography, and crowds made it worse.
Still, Geysir is worth seeing, especially in good light at off-peak hours. Good conditions were not to be on this trip so we headed off to nearby Gullfoss.
When we arrived it was still overcast, but a scan of the horizon suggested the clouds might break if we simply waited it out. That took a couple of hours and these are the results.
Once again, spray was a huge problem. Carry lens wipes.
Shooting Tips
I like to take vertical and horizontal images of the same scene. If you have hopes of magazine covers, it’s best to consider vertical images. Here are some of my Magazine and Book Cover Credits.
Also consider people. Do you want them in or out. Here is the same image, two ways, with and without people.
The only difference in the above images is people. The first image has them, the second doesn’t. The people did not move. Rather, I edited them out in Photoshop, via a bridge from Lightroom.
Photoshop tools are much better at editing out distractions than Lightroom. Most often I use Photoshop’s clone align feature. Lightroom has nothing similar. At times, especially for small spot corrections, Lightroom is easier.
Both programs compliment each other nicely, but it’s irritating having to learn two products and two sets of commands.
Forced to make a choice between Lightroom and Photoshop, I would choose the former. Lightroom’s catalog and library functions are essential.
Pretty soon it may be impossible to make a choice. Adobe wants subscribers to “Creative Cloud” and bundles all of its programs in that package.
Human Interest
Travel magazines generally like human interest. People also add a sense of scale. But calendar companies most likely do not want people in the images.
If shooting and editing for yourself, simply shoot and edit what you like.
Please Share!
If you like this article, please share by email or use one of the share buttons beneath the article.
We stayed in Reykjavik for three nights, and actually managed to get some sleep on one of the nights. Tonight was the night.
On our first day in Reykjavik, we did some touristy stuff downtown and went to a karaoke bar in the evening.
Reykjavik was cloudy all day, and that was good light for photographing the interior of the Harpa Concert Hall. It’s an amazing building with lots of interesting angles.
Here is another set of images from inside the building.
The first image above was taken with a Canon 24MM Tilt-Shift lens. It was perfect for this location. The second image was taken with a Canon 16-35MM F4 L lens at 26MM.
If considering Tilt-Shift lenses, I highly recommend a philosophy of the wider the better. Canon makes 17MM, 24MM, 45MM, and 90MM. For architectural purposes, go with the 17MM Tilt-Shift Lens. I have another Tilt-Shift example coming up, from the last day of our trip.
Reykjavik is a beautiful city. How many days you spend there is simply a matter of taste. For suggestions, please see my free Iceland Guide regarding what to bring, where to go, what to do, where to stay, what to expect in each location, and what literature to read before your trip.
Please Share!
If you like this article, please share by email or use one of the share buttons beneath the article.
Shortly after leaving Breiðavík where the wind had been surprisingly calm at night and the next morning, the wind kicked up. It was very windy when we caught the ferry in Brjánslækur. And it was still windy and cloudy when we arrived in Stykkishólmur. Howling is more like it, at about 40 miles per hour.
The weather was not that conducive for photography, so we decided to tour the Snæfellsnes Peninsula. Towards sunset, the wind stopped blowing as hard, and there were some breaks in the clouds. We waited at Kirkjufell Mountain hoping for some decent light at sunset and were rewarded.
Puffins are the star attraction at Látrabjarg, but the razorbills also put on a very fine display.
Wikipedia notes “The razorbill (Alca torda) is a colonial seabird that only comes to land in order to breed. This agile bird chooses one partner for life; females lay one egg per year. Razorbills nest along coastal cliffs in enclosed or slightly exposed crevices. The parents spend equal amounts of time incubating. Once the chick has hatched, the parents take turns foraging for their young and sometimes fly long distances before finding prey.”
I used high ISOs and fast shutter speeds to freeze the movements in the wings. Choice of shutter speed is a tradeoff between depth of field and wing blur.
We only allotted a single day at Breiðavík. Odds of getting warm weather, beautiful light, with no wind was not that good. Breiðavík is frequently rainy and windy, but we were blessed with a perfect day.
In my Iceland Guide I recommend spending another day at this location. Realistically one could easily spend several days. There are other things in the area to see and do, but the bird cliffs are the main attraction.
I highly recommend taking the Taking the ferry between Stykkishólmur and Brjánslækur to get to or from the cliffs on a circle tour. The ferry will save several hours of travel time. Reservations advised. Allow a couple of hours travel time from Brjánslækur to Breiðavík.
I did not want to leave Látrabjarg in the morning, but we had no choice. Our ferry left Brjánslækur at noon.
Please Share!
If you like this article, please share by email or use one of the share buttons beneath the article.
After leaving Ísafjörður, we headed to our next stop, the Látrabjarg bird cliffs in Breiðavík. It’s quite a long drive over mountain passes and by waterfalls.
Before heading anywhere in Iceland, but especially the West Fjords, make sure you have a full tank of gas.
We got a late start and did not arrive in Breiðavík until 9:00PM or so. We had a very nice dinner at the Breidavik Guesthouse, which is precisely where you want to stay to photograph the bird cliffs.
We saw puffins at other locations in Iceland, but no other location comes close to the Látrabjarg experience. One can get within a couple of feet of amazing birds simply by approaching low and slow. The birds are used to humans.
Puffins nest in burrows they dig in the sides of the cliffs. One image shows nesting material in a puffin’s beak. The young puffins had not yet hatched so we had no chance to get images of the birds with fish in their beaks, feeding the young puffins.
Many photographers used long lenses. That approach is good for taking full-frame portraits, but I went for a wide-angle closeup look instead. The latter approach give more of a feeling of the high cliff these birds were on. If you fall over the edge here, it will be the last trip you take alive.
I never felt unsafe, but to minimize risk, lay on the ground and creep up on the bids slowly. Once the puffins get used to you, they ignore you or in some cases, seem to want to put on a display.
I used relatively high ISOs and fast shutter speeds to freeze the movements in the wings. Choice of shutter speed is a tradeoff between depth of field and wing blur.
We only allotted a single day at Breiðavík. Odds of getting warm weather, beautiful light, with no wind was not that good. Breiðavík is frequently rainy and windy, but we were blessed with a perfect day.
In my Iceland Guide I recommend spending another day at this location. Realistically one could easily spend several days. There are other things in the area to see and do, but the bird cliffs are the main attraction.
I highly recommend taking the Taking the ferry between Stykkishólmur and Brjánslækur to get to or from the cliffs on a circle tour. The ferry will save several hours of travel time. Reservations advised.
Please Share!
If you like this article, please share by email or use one of the share buttons beneath the article.
The drive in the fjords to Ísafjörður was very scenic. We stopped many times along the way to photograph kelp glowing in the sun. This image was just before sunset.
Positioning the sun right along the edge of a mountain or just behind, but peeking out of any object makes of a diffraction star, and the Canon 16-MM F4 lens does an excellent job. Best effect is when stopped down. Typically I use F16. F22 is not as sharp.
To get this image right, I manually blended several exposures using layers and layer masks in Photoshop. I await a version of Aurora-HDR for Windows to do this in a more automated fashion.
The easiest way to take multiple exposures with a Canon EOS 6D or other similar camera is to setup a custom function for taking multiple images. I take three images, at +0, -2, and +2. If I need another image or two I typically bracket in one direction.
Once again it was very late in the evening and we still had quite a bit to go to get to our hotel in Ísafjörður.
Please Share!
If you like this article, please share by email or use one of the share buttons beneath the article.
The wind was howling when I took the images on this page. I had to hold on to my tripod as the 40 mile an hour winds would have otherwise blown it over. The waves are along the shore somewhere near Hólmavík.
The howling winds made some interesting cloud formations. This cloud seemed like it was a mile long.
Image Details: 24-105MM L lens at 24MM, F/10 for 1/10th second at ISO 100.
I am not quite sure the name of this church. It was somewhere between Sauðárkrókur and Ísafjörður. I believe near Hólmavík. If someone knows, please send an email.
Image Details: 24-105MM L lens at 35MM, F/9 for 1/400th second at ISO 100.
We had dinner in Hólmavík and set off to Ísafjörður for the night.
Please Share!
If you like this article, please share by email or use one of the share buttons beneath the article.
About the only thing I would do different on this shot is bump up the ISO to 400, in order to better freeze the small water bird.
Above Image Details: Canon 24-105MM L lens at 55MM, F/16, 1/10th of a second at ISO 125
Most of my images on the trip were shot between 10:00PM and 4:00AM with images of the same place shot just before and just after midnight. I labeled these images day 10, but I could just as easily called them day 9 as we had not yet gone to bed for the evening.
Please Share!
If you like this article, please share by email or use one of the share buttons beneath the article.
We spent the night in Sauðárkrókur, the largest town in the Skagafjörður fjord region in northwest Iceland. There was a music festival going on, and the town was overflowing. Every restaurant was packed and wait times were as long as two hours. Campers were everywhere.
We escaped to nearby Hofsós, one of the oldest trading ports in northern Iceland dating back to the 16th century. Hofsós, with a population of about 200 individuals, is located 37 KM east of Sauðárkrókur.
The Glaumbær Heritage Site is complex of buildings that depict life in rural Iceland 2nd half of the 19th century to the half of the 20th century.
Feature Image Details: Canon 24-105MM F4 L Lens at 67MM, F/16 for 1/80th of a second at ISO 125.
The Heritage Site was not a specific destination we had in mind. Rather, the site was one one many interesting places we stumbled upon on our Grand Circle Tour of Iceland. See my Iceland Guide for information about what to bring, where to go, what to do, where to stay, what to expect in each location, and what literature to read before your trip.
Here are more images from the heritage site.
Please Share!
If you like this article, please share by email or use one of the share buttons beneath the article.
After a long night’s sleep in Akureyri (one of very few on the trip), we set out for Saudarkrokur, the largest village in the Skagafjörður fjord region of Northwest Iceland.
Along the way we stopped to photograph, farms, streams, and historic sights along the way.
This is a farm outside of Akureyri . The dandelions were in full bloom.
For the second consecutive day we went whale watching. Akureyri is situated in a long harbor, and the water was much calmer. But the whales were not as playful. I captured no usable images.
Back in town we went scouting around, and I captured the above image of Akureyri from across the bay. It’s safe to assume I got wet taking this shot, the third time this trip (more coming up). In this case only my shoes got wet.
For general Iceland tip, please see my Iceland Guide. The guide is packed with information about what to bring, where to go, what to do, where to stay, what to expect in each location, and what literature to read before your trip.
Please Share!
If you like this article, please share by email or use one of the share buttons beneath the article.
This is an image of a moonset over the harbor, right at sunset, shortly after midnight. 1/30th of a second is really pushing things for hand-held photography at 105MM, but I am very steady. I also balanced on a railing and turned image stabilization on.
Without stabilization, the rule of thumb is 1/focal length. In other words, I needed to shoot at 1/100th of a second not 1/30th for a sharp image.
I believe the rule of thumb is too generous. 1/200th would be my standard. Stabilization would bring that down to 1/100th or perhaps 1/50th of a second. The rail helped. This is a sharp image.
99% of the time, if not more, I have stabilization off. I always have stabilization off when I am on a tripod. Stabilization can ruin long exposures because the camera is hunting for induced movement that isn’t present.
After returning from whale watching, all the restaurants were closed. Normally they wait for the returning boats, but all the operators stayed out long because the wales were extremely active, breaching (jumping) all over the place.
One restaurant was still serving spaghetti. It was the only item they had left. It was the worst spaghetti I ever had, covered in some sort of yellow clam sauce. I deemed it inedible after tasting a bite. My wife Liz did not even try. We went to a gas station for some snacks and a slice of pizza.
Please Share!
If you like this article, please share by email or use one of the share buttons beneath the article.
When you watch sunrise and sunset in Icelandic summer (actually in the reverse order), then go to bed at 3:00 or 4:00 AM it’s hard to know how to say what “day” images were taken. Nearly all of the images in our 16-day trip were taken between 10:00 PM and 4:00 AM, definitely not hours most are used to.
If you go on a tour, you will hardly ever be in the right place at the right time for the best photography. It depends on what your goals are. Guided tours may be right for many people, not us.
Image stabilization: On (Please remember to turn off image stabilization when using a tripod!)
Out of several thousand pictures, I kept one series of 3 images. The other two in this series were of the splash.
I made lots of mistakes. What would I do different?
I would have used a higher ISO, say 2000 providing much more depth of field. In this case, focus was slightly off, just ahead of the whale, on the water. Depth of field was sufficient to keep the whale sharp.
I did not have any other images that were sharp, out of literally thousands.
Two other factors entered into play: I was in control of time (choice of tours), but could do nothing at the time about the equipment I had with me (autofocus capability). I discuss both below.
Whale Tours
There are many whale tour operators in Husavik. They are all professional and reliable. The key choice is whether to go out on a larger but slower ship, or a faster raft-like operation that holds a ten people or so. I selected the latter.
The rafts are much faster and can get to the whale areas sooner. They also maneuver much easier. If you want to see the most whales, the rafts are a better choice. However, the rafts provides a poor shooting platform. If I had to do this over again, I would take the larger ships where you can stand up, move around, and have a much better shooting platform.
That said, I am very pleased with the feature shot. I would rather have one great image than one hundred good ones.
Would I have done better from a ship? Since I like this image, probably not, but I would not select a raft again.
For the best light, get on the last trip of the day.
Autofocus
The EOS 6D is a very good camera but its autofocus technology is old, and slow compared to Canon’s newest offerings. This certainly did not help on a raft bouncing in the waves.
My backup is a Canon 5D mark II. The latter cost more, and has more pixels. However, the 6D has better noise reduction in shadow areas, and better dynamic range. The 6D is a better camera for most of my shooting.
Canon’s EOS 5D Mark III was not a sufficient improvement over my 6D to warrant purchase.
Buy List
Canon’s EOS 5D Mark IV provides nearly everything I want: better noise reduction, better dynamic range, much better autofocusing, better video capability, and 50% more pixels than my EOS 6D.
Technology constantly leap-frogs. In some respects, notably noise reduction, Canon barely caught up with Nikon and not quite to Sony. But in autofocus, video, and still images captured from video, Canon is ahead.
George Lepp at Outdoor Photographer did a Canon EOS 5D Mark IV Review on November 29, 2016. I have been reading George Lepp and Outdoor Photographer for decades and recommend a subscription to Outdoor Photographer.
Also see an excellent EOS 5 Review by Jim M. Goldstein at JMG Galleries.
I dropped off my wife Liz at the hotel and went on to the Hverir Geothermal Area. If I had to do this again in two nights, I would have spent sunrise and sunset at Selfoss/Dettifoss, then sunset at Goðafoss, then scramble to get back to Hverir for sunrise.
These images were taken an hour or so after sunrise. The light was still beautiful, but I have visions of pink steam rising from these vents at dawn. I do not know if that happened or not.
I now use a Canon 11-24 F4.0 L lens: This lens is a new replacement for the 14MM lens. It is the best wide angle zoom lens in the world. Period. Yes, it is very expensive. It is sharp in the corners, little or no astigmatism, or other common zoom lens flaws. At 11-24 MM it is the widest zoom lens around and it is sharp.
If you shoot Canon and can at all afford it, get it. As a second, much lighter, and easier to carry choice is the Canon 16-35MM F4 L Lens
Super wide angle lenses like this require a different approach.
You have to be right on top of your subject
You need something interesting in the foreground
You need something interesting in the background (typically the sky or mountains)
It is critical to pick a spot where everything is in focus. Alternatively, use a focus stacking technique and blend images taken at different docus spots.
Hverir Geothermal Area
The feature image and the last two images above were shots with a Canon 14MM lens. I am inches away from that steam vent in the final image. The other images were taken with a Canon 16-35MM F4 L Lens at varying focal lengths.
I used manual focus (as I normally do with landscape photography) to ensure focus is where I want.
As I pointed out in my Iceland Guide, it would have been better to spend a minimum of three days in the Reykjahlid/Lake Myvaten area. There is much to do and lots of things we did not see.
However, we had prearranged plans in Husavik.
Equipment List
Those interested in my equipment and recommendations can find it here: Mish’s Equipment List.
Please Share!
If you like this article, please share by email or use one of the share buttons beneath the article.
After leaving Selfoss and Dettifoss waterfalls in a sunset/sunrise combo, we headed to our hotel and had some difficulty finding it. I feared we were in for another night in the car but eventually found our room at something like 3:00 or 4:00 AM.
Fortunately, we had a two-night stay. I suggest three days minimum in the Reykjahlid (Lake Myvaten) area. There is much to do and see.
Instead of having to scramble to the next location, we took a relaxing dip in the hot springs and visited the Hverir Geothermal Area. Afternoons in Iceland are for exploring, traveling, and relaxing. The images of the geothermal areas I took in the afternoon all went in the digital wastebasket.
We took too much time relaxing and sightseeing that it was a mad scramble to get to Goðafoss for sunset. For the third time on the trip, we barely made it. I took images at sunset, and once again my wife Liz was patient and volunteered to sleep in the car for a bit, waiting for sunrise an hour or so later.
Feature Image Details: Sunset Canon 16-35MM F4 L Lens at 21MM, F/16 for 1.3 seconds at ISO 100.
Spray was a huge problem on this side and I was constantly wiping off the front of my lens. If the wind is blowing in your face, spray is guaranteed to be an annoyance.
The next two images were taken on the other side of the river at sunrise. There are several nice vantage points on each side, with lots of possibilities, especially if you arrive at the location with ample time.
With another sunset/sunrise combo out of the way, it was off, not to bed, but to the Hverir Geothermal Area.
Equipment List
Those interested in my equipment and recommendations can find it here: Mish’s Equipment List.
Feature Image: Canon 24-105MM F4 L lens at 47MM, ISO 100, F/16, for 3.2 seconds.
As noted in my previous article, Dettifoss and Selfoss are a pair of waterfalls on the Jökulsá á Fjöllum river. You arrive at Dettifoss first. A short 10-minute hike or so leads to Selfoss.
This pair of waterfalls was on my “must get good images” list. We arrived near sunset, with Dettifoss in a deep shadow. I thought we would have to come back.
We hiked on to Selfoss and the light was amazing. After photographing gorgeous rainbows at Selfoss, we hiked back out. That’s when I met Tony Prower, the proprietor of Iceland Aurora Photo Tours and Workshops.
Tony told me to wait around for a while to photograph Dettifoss at sunrise. While my wife Liz slept in the car, I was out with Tony. Here are more of the results.
Image Details: Canon 24-105MM at 28MM, ISO 100, F/18, for 0.4 seconds.
The above image is looking downstream of Dettifoss along the Jökulsá á Fjöllum river.
Image Details: Canon 24-105MM at 47MM, ISO 100, F/16, for 10 seconds.
All of the images on this page were taken pre-dawn. In Northern Iceland you can photograph sunset, wait an hour or so and photograph sunrise. Over the course of that wait, light levels can change a lot. The second image was also way underexposed. It took quite a bit of effort in Lightroom to bring out the shadow details.
The horizon was relatively flat, so graduated neutral density filters work reasonably well but now I prefer using Lightroom controls.
There are other techniques. Tony taught me an interesting one: He used his coat sleeve as a filter, holding it over the top portion of the lens, sliding it up and down. It takes some practice. And it takes a long exposure, at least 3 seconds.
I used his technique, setting my exposure compensation to +2, boosting the exposure, then reducing it with my coat sleeve. Results are obviously not repeatable, but you can get some interesting effects. The feature image was shot with this technique.
I have not used Tony’s method much since, but I now take my graduated neutral density filter, hold it by hand, and move it up and down rather than putting it in a holder (which I never had), or holding steady as I did do.
Once again, it takes long exposures to use either my method or Tony’s. One might also try painting a piece of cardboard black, or using a black piece of plastic in lieu of a coat sleeve. I have been meaning to try that, but I haven’t yet.
Right at sunrise, a huge fog bank rolled in. Tony said, “I know this experience well. That’s it for the evening”.
We were quite a ways from our hotel and it was early AM already. The saving grace for this stop was we had a rare two-day stay in Reykjahlid (Lake Myvaten), the only multi-day stop on our trip except for a final stay in Reykavik.
Please see our Iceland Guide for recommendations and details.
At this spot, the best shots at Selfoss were right at sunset. The best shots of Dettifoss were pre-dawn. Seconds after sunrise, everything turned dense grey.
Selfoss and Dettifoss are a pair of waterfalls on the Jökulsá á Fjöllum river. You arrive at Dettifoss first. A short 10-minute hike or so leads to Selfoss.
I was driving like mad to get to this location, fearing we would be too late for sunset. We were, in fact, too late for Dettifoss. The waterfall was in deep shadow. The light was gone.
I figured we would have to come back the next day, but we took the path to Selfoss. Although Selfoss is lower in elevation, light from the setting sun had a clear path. The result was a magnificent rainbow, the best I have ever seen.
The light was quite bright, and a polarizer barely provided enough light reduction to smooth out the water.
I did not help matters one bit by shooting at ISO 160 instead of 100. It was an accident that I did not catch. Not wanting to overexpose the the highlights, I made a second mistake by underexposing the shadows. That would have helped smooth out the water as well.
Feature Shot Details: Canon 16-35MM F4 L lens at 24MM, ISO 160, F/16, 1/5 second.
Water on the rocks above is not from the river, it’s an accumulation of spray.
Details: Canon 16-35MM L lens at 16MM, ISO 160, F/16, 0.4 seconds.
The above shot is looking across the scene.
Details: Canon 24-105MM F4 L lens at 65MM, ISO 160, F/22, 0.4 seconds.
Shooting at F/22, as I did, is a mistake. That focal length is not as sharp as mid-range F-stops. From this distance F/11, focused on the waterfall would have been about right (there was no foreground to keep sharp). However, F/11 it would not have blurred the water like I wanted.
The solution, as I have mentioned before , is a set of neutral density filters. Polarizers can help, but you have to be careful in how they are rotated or they will obliterate the rainbow. A better choice would have been a neutral density filter. I now carry B&W ND filters of strength 3.0 (10 stops), 1.8 (6 stops), and 0.6 (2 stops). Six stops would have changed the exposure to 2 seconds or so at F/11.
Spray from Selfoss is intense, with emphasis on intense. You don’t exactly get soaked, but if the wind is blowing towards you, which it was for us, your lens will be covered with spray between every shot.
Have a box of lens cleaning tissues handy. Even though I wiped the filter between every shot, I spent a very long time in Lightroom removing spots caused by spray on the filter. Many shots were so covered with spray as to be unusable.
I also took some images with a Canon 14MM F2.8 L lens, capturing the complete rainbow plus more of the side waterfall. The images were beautiful except for one thing: The water looked awful (frozen, not silky), so I tossed the images in the digital bit bucket.
The problem was of my own making.
The 14MM lens does not take outside filters but it does take gel filters in the back, and I had them with me. However, I was not about to be fiddling around with gel filters with all that spray and with the light changing fast.
If you have a 14MM lens and are going to be photographing waterfalls, put the gel filter in ahead of time. For further discussion please see the section on the 14MM L lens in My Equipment List.
Rainbow Tips, Rainbow Math
The apex of a rainbow is 180 degrees from the sun. You will not see a rainbow looking towards the sun. If you see rainbows images that face the sun, they are fake. Here, you can see the light on the waterfall and the foreground rock. The rainbow is from sunlight refractions through the spray, just like a prism. There is no rainbow in the third image because camera positioning was at a right angle to the sun.
When looking for rainbows, make sure the sun is at your back. The lower in the sky the sun is, the higher the rainbow apex. At noon, depending on latitude, rainbows may be below the horizon, invisible. Thus, it is appropriate to consider terms like “rainbow rise” and “rainbow set”.
The huge, more than 180 degree arch in the second shot is because the sun is on the horizon and the foreground was below the horizon.
From an airplane, it is possible to see a 360 degree full circle rainbow.
Please Share!
If you like this article, please share by email or use one of the share buttons beneath the article.
We spent our fifth night in Bakkagerði. The trip from Seydisfjordur was cloudy the entire way as was sunrise the next morning. I got up but the clouds were dense and I went back to bed for some much needed rest.
Clouds broke around noon and I took images of a stream in the East Fjords somewhere near Bakkagerði.
Arctic terns nested somewhere near that stream. They dive bombed me to let me know I was not welcome. Unlike the Jökulsárlón Arctic Tern Nesting Site where 50 or more terns might dive bomb you at once, I only had a couple to deal with at this stream.
I have a love-hate relationship with polarizers. They do a wonderful job of removing glare but they also enhance unevenness in blue skies.
It took me a long time to smooth out the sky in the feature image, but the polarizer greatly enhanced the color in the rocks. People use polarizers to “enhance” skies, but I hate the effect. I am waiting for someone to come out with a “depolarizer” filter for Lightroom and Photoshop to clean up skies.
If I could do this over again, I would take a pair of images one with the polarizer and one without, then blend them in Photoshop.
Don’t just think of polarizers on sunny days. My favorite time to use polarizers is actually a cloudy day in the fall, with a stream and lots of colorful red and yellow leaves on the ground. Try it. Polarizers will do wonders for your images, especially of wet leaves.
Please Share!
If you like this article, please share by email or use one of the share buttons beneath the article.
I found out about Seydisfjordur in the Eyewitness Travel Top 10 Iceland book. Its listing of 10 Charismatic towns described Seydisfjordur as follows: “Chocolate-box wooden architecture makes Seydisfjordur the prettiest East Fjord town”.
The two interior images were taken at the Borgarholl Arts & Crafts shop. We purchased some woolen items.
The shop also served as the owners home. She was gracious to let me photograph the interior of her house.
For those shots I used my Canon 16-35MM F4 L lens, one at 24MM the other at 32MM. Exposure was about 1 second each at ISO 125.
The fishing boats leave very early in the morning and may not be back in harbor until the afternoon. I shot those images just after midnight. Lights came on just a bit later, not that they were needed. The glow in the second image is from the lights. At 1:00AM the fishermen headed out to sea.
Please Share!
If you like this article, please share by email or use one of the share buttons beneath the article.