
The first major stop on the Subway Trek is Archangel Falls, covered in my last post. Moving upstream, one comes up to a flat area where flowing water carved a deep crack in an otherwise flat surface.
The area around The Crack” is exceptionally slippery. I fell twice as did a couple of other people. I recommend having or renting a pair of shoes suitable for such conditions. I had no such shoes and paid the price. The weather was warm enough we did not rent wetsuits but such gear is nearly mandatory for hiking “The Narrows”
Feature Image Details
- Canon EOS 6D (I now use and highly recommend the EOS 5D Mark IV )
- Canon 24-105MM F4 L Lens
- F11 for 0.8 seconds ISO 100
Someone asked me what the yellow leaves were in the Archangel Falls image. Apologies for the delay in answering. There are at three different yellow leaves. There are smooth oval leaves and I do not know what those are at all. Aspens, Poplars, and Cottonwoods are all in the same general family, and they are toothed. The aspens are generally yellow. I do not know the variety. Bigtooth maples can also be yellow but they were mainly red or orange.
The red and orange leaves, and a couple of the yellow ones in this feature image are bigtooth maples. I have more images of brilliant maples coming up later.
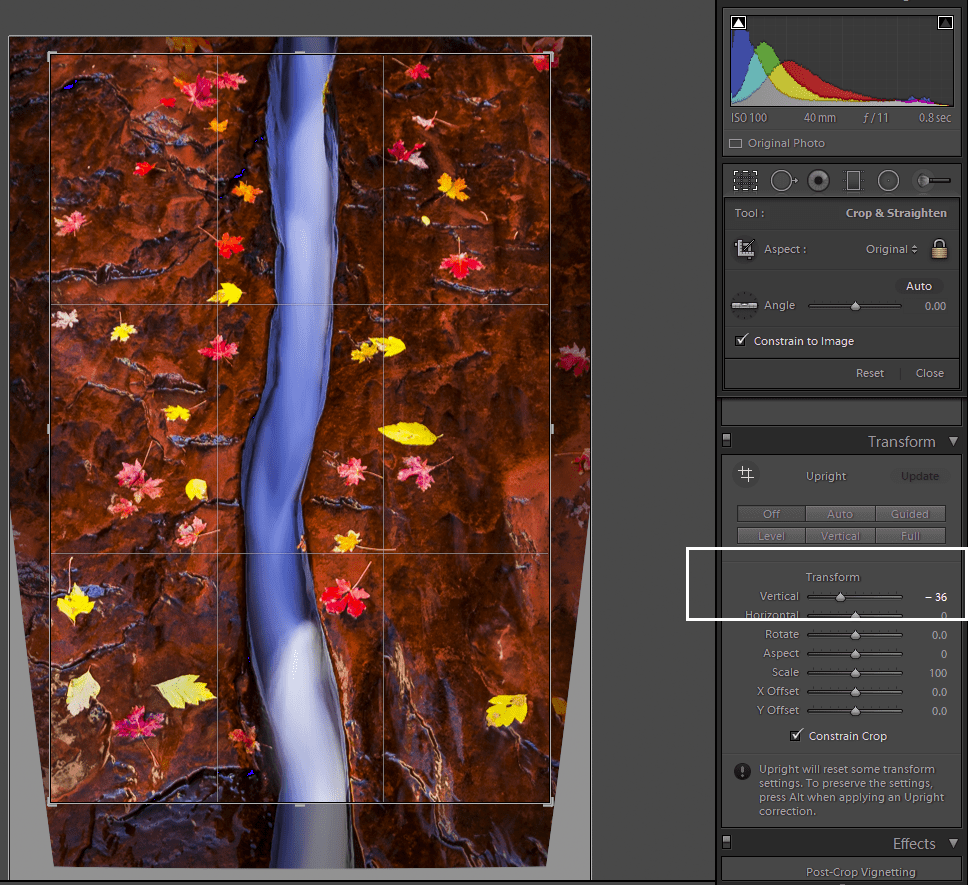
Perspective Control
The best way to take this image is pointing straight down. Otherwise, you will see the railroad track effect. To shoot straight down, one needs a tripod with a center arm that will collapse to a horizontal position. My tripod does that, but that setup takes more time, and people were stacking up behind us. I did not want to get to the Subway so late as to miss the best light or not get a good position.
My straight-up image of the crack does have a bit of a railroad track effect, but I partially corrected that in Lightroom. Here is the image without perspective modification.

Notice the leaves get smaller away from the lower end of the photo. I could not eliminate the railroad track perspective issue completely without causing unwanted cropping distortions, but the effect is barely noticeable now. The next image shows how.
When you change perspective, you will end up clipping a portion of the image.
It is conceptually easier to simply take the shot horizontally and display it vertically but I kept getting my tripod legs into the picture. Again, using an extension arm that moves horizontally is the correct approach.
I intended to take more images of the crack after photographing the subway but the light had changed. Direct sunlight ruined the shot.
Hike Comments
The subway hike is 6.5 miles round-trip and is rated strenuous. I would rate it moderately-strenuous. The elevation change is mostly gradual except for a steep 600-foot change at the beginning (down) and end (up).
For comparison purposes, I would rate Angel’s Landing with a 1500 foot elevation change as strenuous. Yet, the Subway requires scrambling and the trail is very slippery in spots. I fell twice and one person slipped into the pool at the Subway (it’s deep). Get or rent a pair of shoes suitable for wet slippery conditions. The outfitters near the park can help.
Mark your entry/exit spot with GPS, by time, or both. There is no clear path to the end of the Subway trail. Two hikers we came across were convinced they passed the exit spot. They were going to scramble up loose rocks to the top. They were convinced their car was at the gap at the top. I talked them out of it.
It is better to be lost on the main route than lost where only a search party may find you. It turns out, they were a mile away from the path up.
Light Tips
To get the best images, be at the trailhead before dawn and set out as soon as you can see, if not before (using headlamps). Once the sun hits the waterfalls the best light is gone. Reflected light is best. Strong reflected light is required for a great shot in the Subway itself.
Lens Selection
If I had to pick two general purpose lenses, the 16-35 and the 24-105 would be clear standouts. Those were the only two lenses I had with me for this 6.5 mile hike.
Reduce weight and hike happier!
Since there is overlap, I would prefer the second lens to be 35-135 or 35-150 instead of 24-105. Canon does not make my preferred choice.
Equipment
Those interested in my equipment and recommendations can find it here: Mish’s Equipment List.
Please Share!
If you like this article, please share by email or use one of the share buttons beneath the article.
Much more coming: Click to Subscribe by Email.
Next up “Inside the Subway”
For more information regarding the “Subway Trek” and a nice shot of Archangel Falls as well, please see Zion National Park – Subway Trek Part One – Archangel Falls
Equipment List
Those interested in my equipment and recommendations can find it here: Mish’s Equipment List.
Please Subscribe: Click to Subscribe by Email.
If you like this article, please share by email or use one of the share buttons beneath the article.
You can also follow me on Twitter! I have both an economic forum and a photography forum.
- Photography: MishMoments
- Economics: MishGEA
MishMoments is a subset of MishGEA. Those interested in photography only should follow MishMoments.
Please Subscribe and Follow.
Thanks!
Wow, just wow!
Nice shot and great write up. That water must have been moving pretty fast to get that much motion out of 8/10s of a second. Was that an HDR composite or just a single shot? Just wondering about the colors on the rock, they look a little “processed” but still very interesting.
That water was moving very fast. Mechanically, that’s what happens when you move a large flow through a small slot. There was a thin layer of water over everything, nothing was artificially wettened. That’s what made it very slippery. Photographers did add some leaves and I took a few away to make it look more natural. But there were leaves all around.
That was a single shot, not an HDR composite. I had a polarizer on. Reflected light in these slot canyons is simply amazing. A polarizer enhances the effect. I should have talked about that. Will mention it in the next set of images from inside the Subway. This really did look much like this to the naked eye.
.8 seconds is quite long enough to blur moderately fast moving water. 1/4 second would likely have worked in this case. It helps that there was no direct light on anything in the image.
What next, Mish? Superb website, ditto pictures I cannot believe digitally strained (I have a humble Nikon D40).
If you can bake a cake, I’ll nominate you for the Uffizi right next to Leonardo…
Bill